Using buttons
The use of clear buttons is essential to every intervention. To add a button:
- Click Button in the bottom tool bar.
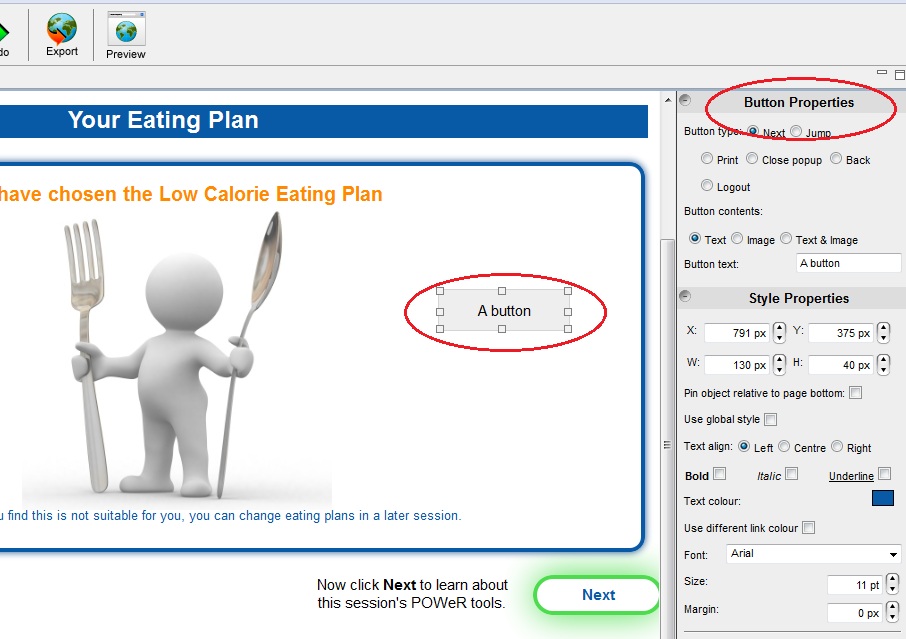
- A generic grey box will appear with the text A button.
- When you click on this box the Button Properties tool bar will appear to the left of the authoring tool.
- Using the Button Properties you can choose the type of button e.g. Next, Back, etc. If you want the next page in your intervention to be a page that is not necessarily next in the logic file, use a Jump button and type in the name of the page you would like the button to go to.
- Within the Button properties you can also change how the button looks, e.g. colour, style, text.
Important information about Jump buttons
- If you have error messages on a page, you must use a Next button. If you use a Jump button, your error messages will not work (because users will be jumping to another page in your logic and not progressing through the logic line by line).
- Jump buttons do not work on templates.
- Where possible, it is advisable to take users to a different page using logic in the logic file, i.e. by using (
after...if...goto...) logic rather than by using Jump buttons, as it's a more methodical process and if something doesn't work correctly, it's easier to track what's gone wrong by looking at the logic file. - If you use Jump buttons on a page, please make sure that in your logic file, you do not have any functional logic commands such as
sendemail, savevalue,etc. immediately after the pages with the 'Jump' button. The reason for this is that when end-users click on a 'Jump' button, any logic commands which occur immediately after theshowpage logic in the logic file, may not be executed. The Jump button will take the end-user to the page specified on the button and anything in the logic occurring after theshowpage logic may be ignored.
In the example below, you could have a Jump button on page sport1 which will take you to sport3. You should NOT put a Jump button on sport3 because the sendemail logic will not work and the session2 email will not be sent.
show sport1
show sport2
show sport3
sendemail("session2", user1@study.com, "Session 2", "Session 2 is ready! Please login soon.", 600)
show sport4
show sport5
Buttons on Templates
You may want to put Next and Back buttons on one or more of the templates so that you do not have to add them each time and they look consistent throughout the intervention. You cannot use Jump buttons on templates.
It is a good idea to stick to a particular format for buttons throughout your intervention, i.e. keep them all the same size/shape. If you are going to use a button on many pages (e.g. the 'Next' button), copy and paste this from page to page (if it is not on your template) so that it looks exactly the same each time and you do not have to remake it.
Changing the look and feel of buttons
To change the look and feel of a button follow these steps:
- Click on the button you would like to change.
- You will see Button Properties appear on the right hand side of the authoring tool.
- Within this tool bar you can change the font style, colour, size etc, along with the button border style and colour.
It is a good idea to have all buttons with the same function within your intervention look the same, for example, all 'Next' buttons should look the same. 'Back' buttons may be a different colour to the 'Next' buttons, but for a more professional finish, make them the same overall design.
See image below - make sure you scroll down within the 'Button Properties' to make use of all the functions:
