How to ask users questions and record their responses
Interactions
In order to give tailored advice to end-users you first need to find out information specific to their circumstances. This is done using interactions.
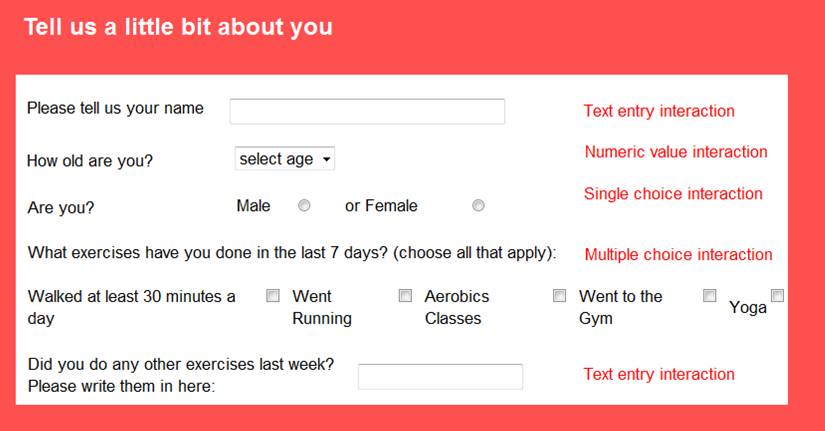
To create an interaction, click on the Interaction button, and select the interaction you want from the following: Single/Multiple Choice, Text Entry, or Numeric Value. Examples of each type of question can be seen in figure 1.
When you have selected your interaction, a newly created interaction object will be displayed on the top left hand side of the editing area with the words Question and Response written beside it.
You can delete the word Question in the interaction properties and write your own question. Writing your question in this area means that your question remains positioned right next to the responses.
If you want to have more control over where you can position the question is relation to the interaction, you can create a new textbox, type your question in the Text entry area and move the text to the position you want.
Each interaction on a page will need a unique name. The names of your interactions are important as each variable name will be exported with the data. Choose names that will be useful as variable names when it comes to analysing the data. Short names are also recommended as these will be easier to view in Excel.
Single/Multiple Choice interactions
Single choice interactions allow your end-user to select only one of the presented responses and are used when you require only one response from an interaction (e.g. if you ask the end-user to select if they are male or female).
Multiple choice interactions allow you to choose how many options end-users can select from an interaction and are used when you want them to select a number of response options (e.g. selecting all of the different types of exercise that they have done over the last week).
Single choice interactions will use circle checkboxes, and multiple choice interactions will use square checkboxes.
Single/Multiple choice interactions are set to single choice by default. Change it to a multiple choice interaction by adjusting the number of maximum choices.
By default, the response labels (e.g. male, female) for the interaction will be displayed vertically and to the left of the interaction checkboxes. Change this layout by checking the corresponding Layout options.
You can change the size of your single/multiple choice interaction buttons by selecting the use bigger buttons option from the interaction properties menu. NB There are some bugs associated with the use of bigger buttons and we recommend that you use the regular sized radio buttons until the bugs are fixed.
Edit the responses that will be presented to end-users by clicking on Edit Responses. As usual in LifeGuide the responses will need their own unique names.
The Unique Response Name is the name used in any logic relating to the individual response. It is important to choose names that will be useful when analysing your data because these names will be displayed in the Excel spreadsheet when you export your data. The Response Text is the response option that the end-user will see (see figure 2).
Add as many responses as required or delete any that you no longer need using the Add new response or Delete me buttons.
Text entry interactions
Text entry interactions allow end-users to type their own responses in an interaction (for example ‘type any other exercises you did last week in the box’ – see figure 12). Some uses of text entry interactions include:
- Collecting short written information (e.g. name, e-mail and a password)
- Giving end-users an ‘other’ option in case other interactions do not have a suitable response
- For collecting other qualitative data such as feedback in the intervention.
Although you can collect text entry responses to then re-show to them in later parts of the intervention, you cannot use these interactions to give tailored advice.
Any information written in a text entry interaction will still be collected by the intervention manager and can be exported to excel.
Numeric Value Interactions
Numeric value interactions are used in interactions asking end-users to select a numerical response (e.g. asking for age or asking them to rate something), or when you want to collect numerical data from the interaction for statistical analysis.
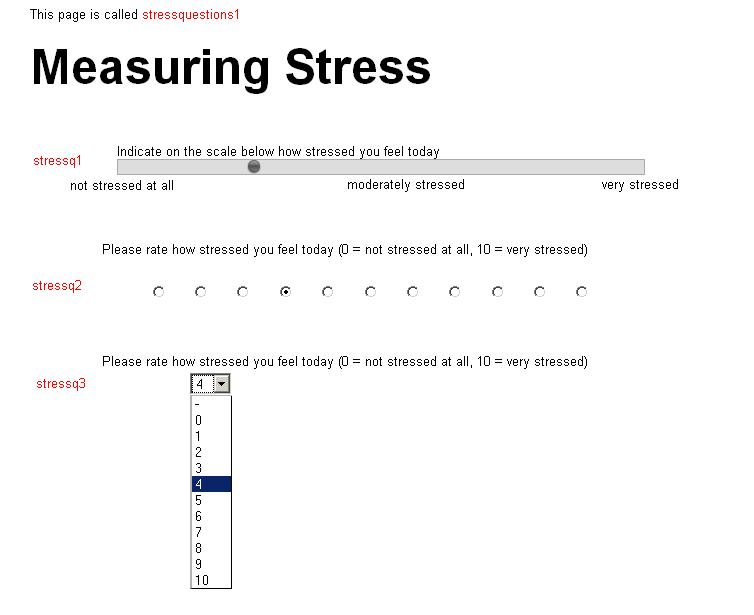
Numeric value interactions can be displayed in one of four different ways: individual buttons, drop-down list, slider or a vertical slider (see figure 4). The only difference between these types of interactions is the way in which they ask end-users to give a score.
Setting the range for the numeric value interaction
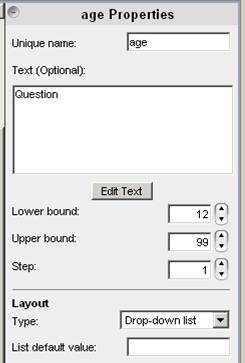
The Lower bound and Upper bound options allow you to choose the range of responses (e.g. 1-10) whilst the step indicates the difference (gap) between each number.
When using a drop-down list, the List default value allows you to edit what the end-user sees when the drop-down list is closed. You can enter - as a default value if you do not it to be 0.
Figure 5 illustrates the options selected for the age question presented in figure 1. For this example the lowest possible response has been set to 12 whilst the highest response is 99.
As we are asking for age, a step of 1 has been chosen to ensure that every possible age is presented in the drop-down menu.
Graphs
Graphs are a useful tool for charting end-user’s progress throughout an intervention.
They work by taking the information that an end-user enters in a numeric value interaction from one page in the intervention and setting it on another page that includes your graph.
The Using Graphs In LifeGuide section includes full information about this feature


