Creating Links
Jump to navigation
Jump to search
You can include hyperlinks to other pages in your intervention, external websites, documents (e.g. pdfs), or to send an email by using the Set Selected Text As... button in the textbox properties menu:
In the page properties menu:
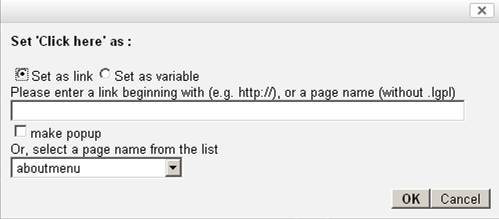
- Highlight the text that you would like to set as a link and then choose the Set as Link option.
- Type the page name, web address or document name (including the file extension, e.g. training.pdf) that you would like to link to, or select a page from the drop-down menu.
- To link to the end-users email application, type in mailto: followed by the email address you would like the email sent to. E.g. mailto:someone@gmail.com

thumb
- To link to a document or other type of file, type the document name, including file extension, e.g. diary.pdf. You will have to put the document into your Workspace folder for this to work. Please see below for instructions on how to do this.
- If you want the link to open as a pop-up box, check the make popup option
- Pop up boxes will open as a separate tab/window to the page that the end-user is currently on – we would suggest using this if you are linking to an external webpage or linking to a document.
- If you do not select the make popup option then the page will display in the same window that they are already on. They will then need to click either the back button on the web browser or a back button placed on the intervention page to get back to the original page.
- Click ok to create the link
By default, the link will appear blue and underlined. When an end-user has visited the link it will become purple. You can choose a different colour for the unvisited and visited links by changing the options on the page properties menu:
- Uncheck Use global style
- check Use different link colour
- then select your colours for Link colour and Visited link colour.
Linking to documents (e.g. pdf files)
If you are linking to a document, this document must be in your workspace folder:
- Go to the folder where you have saved your document
- Copy and paste it into the Workspace of the Authoring Tool (by right-clicking on it and selecting Copy then choosing Paste, this can also be done by dragging it from one folder to the other). The Workspace is found in the LifeGuide folder in the C drive of your computer.
- You will then need to click on your project folder in the Project Explorer area of the Authoring Tool and press the F5 button on your keyboard or close the Authoring Tool and open it again to refresh the tool so that you are able to see the file in the project explorer.
You can the follow the step-by-step instructions above to link to the document in your intervention.