Adding researchers to a live intervention
Due to GDPR and updates to LifeGuide system, we now advise all people on study teams who need access to a live intervention to have separate accounts and not to use a single shared LifeGuide account.
This is because all access to personally identifiable data is now audited by LifeGuide. When a participant applies their right to be forgotten, LifeGuide can identify all researchers who have exported data that contains the participant's data and when those exports occured. This allows the LifeGuide team to accurately inform those study teams to delete that participant's data appropriately.
You can do this by adding researchers to your intervention and giving them appropriate access to study data.
Adding Researchers
- First, make sure the people you would like to add have signed up to the Live Server here:
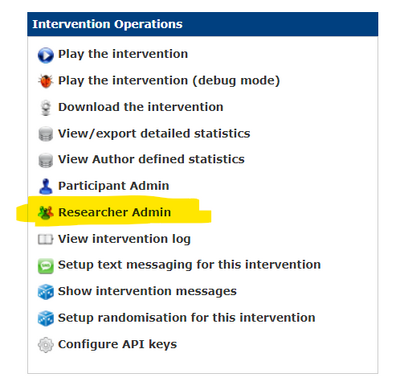
- On the 'Intervention Details' page of your intervention, select 'Researcher Admin'
- On the Researcher Admin screen, enter the researcher's full email address and then click on "Find Researcher" to locate their account. This will show multiple accounts if that person has multiple accounts with the same email address. Once you have identified the correct account then click on "Add Researcher" to add them to the intervention.
Changing Researcher privileges
When researchers are added, they start with no access to data. The intervention owner can allow researchers access to view and export data by changing their privileges.
- Select 'Researcher Admin' from the Intervention information on the Intervention details page.
- You will see all the researchers currently on the intervention. Click on one.
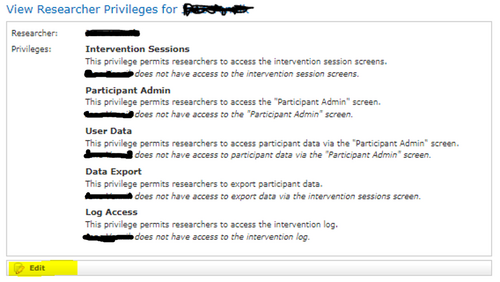
- You will see all the current privileges of the user. Select 'Edit'
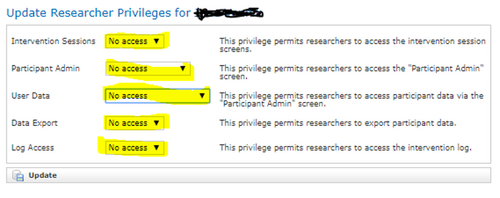
- Select the privileges you want from the drop-down menus
- Select 'Update'


