Adding borders and colour blocks: Difference between revisions
Jump to navigation
Jump to search
KirstenSmith (talk | contribs) (Created page with "==Adding a colour block== Colour Blocks in Lifeguide are made by colouring an empty text box. To make a colour block: #First create a textbox on the page #Under '''Style Prope...") |
KirstenSmith (talk | contribs) No edit summary |
||
| Line 3: | Line 3: | ||
#First create a textbox on the page | #First create a textbox on the page | ||
#Under '''Style Properties''' uncheck '''Use global style''' | #Under '''Style Properties''' uncheck '''Use global style''' | ||
#:[[File:GlobalStyle.png|600px|center|alt=Uncheck gloabl style]] | |||
#Scroll down the menu until you can see '''Background, Border and Shadow'''. If you can't see it, click the minus '''-''' button next to '''textbox-1 Properties''' to minimise the text editting area. | #Scroll down the menu until you can see '''Background, Border and Shadow'''. If you can't see it, click the minus '''-''' button next to '''textbox-1 Properties''' to minimise the text editting area. | ||
#Check '''Use background colour''' | #Check '''Use background colour''' | ||
#:[[File:BackgroundColour.png|600px|center|alt=Allow background colour]] | |||
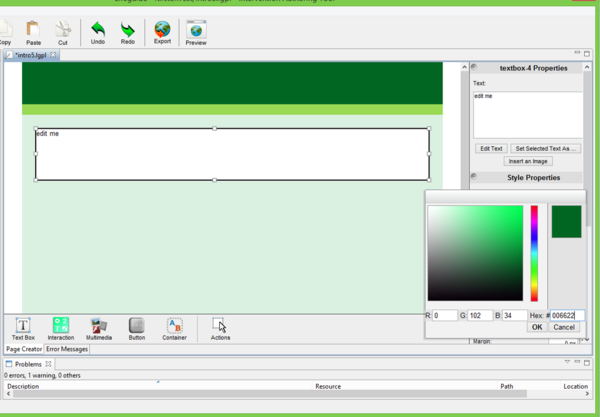
#Click on the box next to '''Background colour:''' to bring up the colour picker | #Click on the box next to '''Background colour:''' to bring up the colour picker | ||
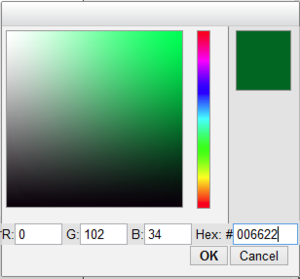
#Select your colour from the colour picker by clicking on the 2 colour gradients. | #Select your colour from the colour picker by clicking on the 2 colour gradients. | ||
#:[[File:ColourPicker.png|300px|center|alt=Lifeguide Toolbox colour picker]] | |||
#:''Alternatively, you can use a [http://www.w3schools.com/colors/colors_picker.asp HTML Color Picker] to explore colours and copy the HEX code (e.g. '''FF0000''' for red) into the Hex box in the Lifeguide colour picker. This will help you keep a consistent palette of colours for your intervention'' | #:''Alternatively, you can use a [http://www.w3schools.com/colors/colors_picker.asp HTML Color Picker] to explore colours and copy the HEX code (e.g. '''FF0000''' for red) into the Hex box in the Lifeguide colour picker. This will help you keep a consistent palette of colours for your intervention'' | ||
#Scroll up to the top of the menu and delete '''edit me''' from the text box editor | #Scroll up to the top of the menu and delete '''edit me''' from the text box editor | ||
| Line 15: | Line 18: | ||
#Click on the first block. | #Click on the first block. | ||
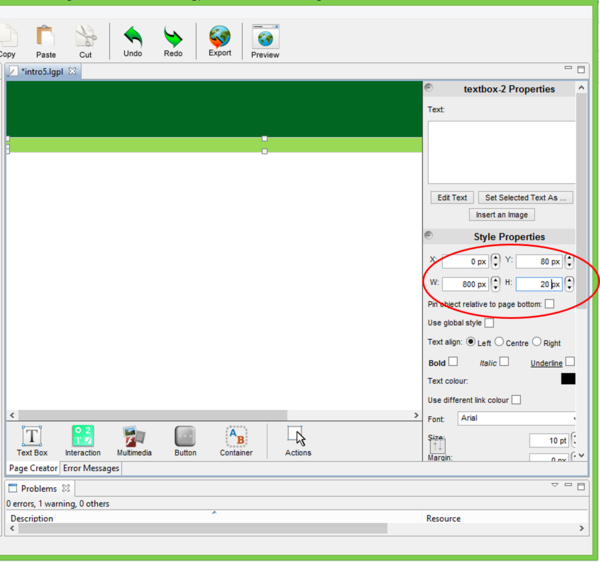
#Under '''Style Properties''' Adjust the '''W''' width and '''H''' Height values. Good page widths are 800px, 960px and 1000px. | #Under '''Style Properties''' Adjust the '''W''' width and '''H''' Height values. Good page widths are 800px, 960px and 1000px. | ||
#:[[File:ResizeBlock1.png|600px|center|alt=Resizing a block]] | |||
#Click on the second colour block | #Click on the second colour block | ||
#Adjust the '''Y''' | #Adjust the '''Y''' and '''X'' values on the colour block by the using the '''H''' height of the previous block and the same '''X''' value as the previous block. | ||
#Adjust the '''W''' width and '''H''' Height values of the colour block | #Adjust the '''W''' width and '''H''' Height values of the colour block | ||
#:[[File:ResizeBlock2.png|600px|center|alt=Repositioning a block]] | |||
#:''By using '''Style Properties''' to position boxes you can space your content evenly throughout the page, making your intervention look more professional.'' | #:''By using '''Style Properties''' to position boxes you can space your content evenly throughout the page, making your intervention look more professional.'' | ||
| Line 27: | Line 32: | ||
#Scroll down the menu until you can see '''Background, Border and Shadow'''. If you can't see it, click the minus '''-''' button next to '''textbox-1 Properties''' to minimise the text editting area. | #Scroll down the menu until you can see '''Background, Border and Shadow'''. If you can't see it, click the minus '''-''' button next to '''textbox-1 Properties''' to minimise the text editting area. | ||
#Increase the border width by clicking the up arrow or typing 1px in the '''Border width''' text box. | #Increase the border width by clicking the up arrow or typing 1px in the '''Border width''' text box. | ||
#:[[File:AddBorder.png|600px|center|alt=Adding a border]] | |||
#Click on the box next to '''Border colour:''' to change the border colour. | #Click on the box next to '''Border colour:''' to change the border colour. | ||
#Select your colour from the colour picker by clicking on the 2 colour gradients, or use the [http://www.w3schools.com/colors/colors_picker.asp HTML Color Picker] | #Select your colour from the colour picker by clicking on the 2 colour gradients, or use the [http://www.w3schools.com/colors/colors_picker.asp HTML Color Picker] | ||
#:[[File:BorderColour.png|600px|center|alt=Changing border colour]] | |||
#:''Try to be consistent with colours throughout your intervention by copying and saving the Hex codes that you use.'' | #:''Try to be consistent with colours throughout your intervention by copying and saving the Hex codes that you use.'' | ||
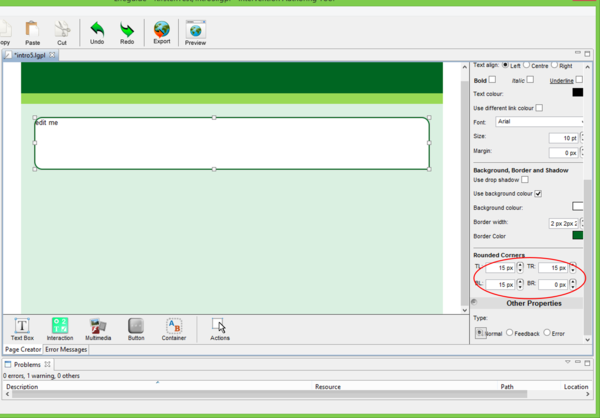
#You can give the box rounded corners by changing Top Left '''TL''', Top Right '''TR''', Bottom Left '''BL''' and Bottom Right '''BR''' under '''Rounded Corners'''. | #You can give the box rounded corners by changing Top Left '''TL''', Top Right '''TR''', Bottom Left '''BL''' and Bottom Right '''BR''' under '''Rounded Corners'''. | ||
#:[[File:RoundCorners.png|600px|center|alt=Rounding the corners]] | |||
#: '''''These do not display correctly in all browsers or in Preview mode.''''' | #: '''''These do not display correctly in all browsers or in Preview mode.''''' | ||
| Line 41: | Line 49: | ||
#Check '''Use drop shadow''' | #Check '''Use drop shadow''' | ||
#Here you can select the '''Shadow Colour''', '''Blur size''' (how far the shadow spreads) and '''X''' and '''Y offsets''' (the placement of the shadow behind the box). | #Here you can select the '''Shadow Colour''', '''Blur size''' (how far the shadow spreads) and '''X''' and '''Y offsets''' (the placement of the shadow behind the box). | ||
#:[[File:AddShadow.png|600px|center|alt=Adding a shadow]] | |||
Revision as of 15:51, 15 November 2016
Adding a colour block
Colour Blocks in Lifeguide are made by colouring an empty text box. To make a colour block:
- First create a textbox on the page
- Under Style Properties uncheck Use global style
- Scroll down the menu until you can see Background, Border and Shadow. If you can't see it, click the minus - button next to textbox-1 Properties to minimise the text editting area.
- Check Use background colour
- Click on the box next to Background colour: to bring up the colour picker
- Select your colour from the colour picker by clicking on the 2 colour gradients.
- Alternatively, you can use a HTML Color Picker to explore colours and copy the HEX code (e.g. FF0000 for red) into the Hex box in the Lifeguide colour picker. This will help you keep a consistent palette of colours for your intervention
- Scroll up to the top of the menu and delete edit me from the text box editor


Resizing and positioning a colour block
Often colour blocks are used to distunguish menu or header bars from page content. They need to be accurately positioned and the correct size. To size and position colour blocks:
- Click on the first block.
- Under Style Properties Adjust the W width and H Height values. Good page widths are 800px, 960px and 1000px.
- Click on the second colour block
- Adjust the Y' and X values on the colour block by the using the H height of the previous block and the same X value as the previous block.
- Adjust the W width and H Height values of the colour block
- By using Style Properties to position boxes you can space your content evenly throughout the page, making your intervention look more professional.


Adding a Border
You can add borders to textboxes with or without text:
- First create a textbox on the page
- Under Style Properties uncheck Use global style
- Scroll down the menu until you can see Background, Border and Shadow. If you can't see it, click the minus - button next to textbox-1 Properties to minimise the text editting area.
- Increase the border width by clicking the up arrow or typing 1px in the Border width text box.
- Click on the box next to Border colour: to change the border colour.
- Select your colour from the colour picker by clicking on the 2 colour gradients, or use the HTML Color Picker
- Try to be consistent with colours throughout your intervention by copying and saving the Hex codes that you use.
- You can give the box rounded corners by changing Top Left TL, Top Right TR, Bottom Left BL and Bottom Right BR under Rounded Corners.
- These do not display correctly in all browsers or in Preview mode.


Adding a Shadow
You can add shadows to boxes, but be aware that modern web styles uses them subtley or not at all. Big shadows may make your intervention look old-fashioned. To add a shadow:
- First create a textbox on the page
- Under Style Properties uncheck Use global style
- Scroll down the menu until you can see Background, Border and Shadow. If you can't see it, click the minus - button next to textbox-1 Properties to minimise the text editting area.
- Check Use drop shadow
- Here you can select the Shadow Colour, Blur size (how far the shadow spreads) and X and Y offsets (the placement of the shadow behind the box).
