How to format text on a page: Difference between revisions
StephHughes (talk | contribs) No edit summary |
|||
| (3 intermediate revisions by 2 users not shown) | |||
| Line 1: | Line 1: | ||
You can | You can add and edit your text in one of two ways: | ||
* Click on the text box containing the text you want to edit | # Using the '''Rich text editor''' by selecting the option '''Edit text''' | ||
* Make sure the tick box next to 'Use global style' is not ticked, (circled in the image below) as you will see more editing options. | # Using the '''Style Properties''' menu by unchecking the '''Use Global Style''' box | ||
The advantages of using the rich text editor over the style properties editor are: | |||
* It allows you to change individual words in the paragraph whereas changing the text in the style properties menu will change every word in the text box. | |||
* It lets you to add symbols (such as the degree symbol - °). | |||
* It allows you to format the paragraphing of your text. The text properties menu requires you to add each paragraph in a separate text box. | |||
* There are 5 different text sizes in the rich text editor (1-5) whereas the style properties menu allows you to use text sizes you are used to (e.g. 10 or 12 point etc.). | |||
If you are using the properties menu, follow these steps: | |||
* Click on the text box containing the text you want to edit. | |||
* Make sure the tick box next to '''Use global style''' is not ticked, (circled in the image below) as you will see more editing options. | |||
* Within this tool bar you can edit the text box as a whole, e.g. change the font size, colour and type. | * Within this tool bar you can edit the text box as a whole, e.g. change the font size, colour and type. | ||
[[Image:formattext.jpg]] | [[Image:formattext.jpg]] | ||
| Line 11: | Line 23: | ||
==Lines, Curves and | ===Tips for using the Rich text editor=== | ||
As the Rich text editor does not have an option for inserting special symbols (e.g. the degree symbol - °) you will need to copy and paste these symbols from Microsoft Word into the text editor. | |||
When formatting individual words in the rich text editor, make sure you only highlight the words that you want to change. If you highlight the space before or after the selected word this will result in the space disappearing in your text. This is an unavoidable feature of the LifeGuide rich text editor. | |||
[[Image:Richtexteditorsmaller.gif]] | |||
==Lines, Curves and Shadows== | |||
[[Image:roundedcorners.jpg|frame|thumb|right|The properties menu for rounded corners and shadows]] | [[Image:roundedcorners.jpg|frame|thumb|right|The properties menu for rounded corners and shadows]] | ||
You can make the edges of your | You can make the edges of your text boxes rounded or shaded using the options in the '''Style Properties''' menu. | ||
To make your boxes rounded change the figures in the TL (top left), TR (top right), BL (bottom left) and BR (bottom right) boxes. | To make your boxes rounded, change the figures in the TL (top left), TR (top right), BL (bottom left) and BR (bottom right) boxes. | ||
NB: To be able to see your rounded corners, you will need to make sure that the border of your text box is wide enough to show up (by default the border of a text box is not set to show). This can be changed using the border width option in the style properties menu. | NB: To be able to see your rounded corners, you will need to make sure that the border of your text box is wide enough to show up (by default the border of a text box is not set to show). This can be changed using the border width option in the style properties menu. | ||
| Line 30: | Line 53: | ||
You can also put lines, curves or other shapes into your LifeGuide intervention by using the tools in Microsoft PowerPoint and saving the shapes as an image. These images are then inserted into your intervention page in the same way as other image files in LifeGuide | You can also put lines, curves or other shapes into your LifeGuide intervention by using the tools in Microsoft PowerPoint and saving the shapes as an image. These images are then inserted into your intervention page in the same way as other image files in LifeGuide. | ||
Latest revision as of 12:01, 18 May 2015
You can add and edit your text in one of two ways:
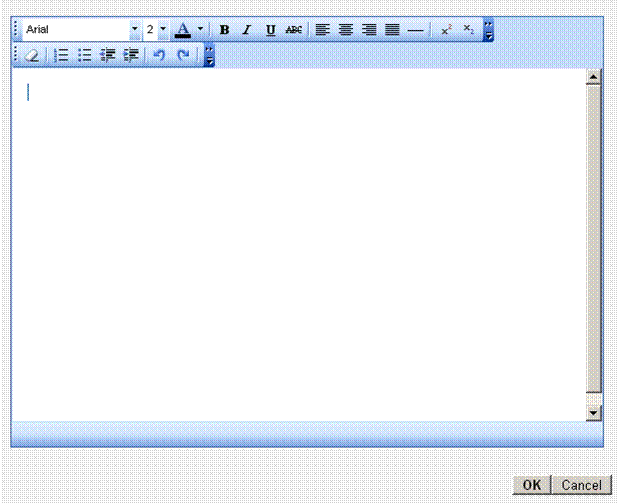
- Using the Rich text editor by selecting the option Edit text
- Using the Style Properties menu by unchecking the Use Global Style box
The advantages of using the rich text editor over the style properties editor are:
- It allows you to change individual words in the paragraph whereas changing the text in the style properties menu will change every word in the text box.
- It lets you to add symbols (such as the degree symbol - °).
- It allows you to format the paragraphing of your text. The text properties menu requires you to add each paragraph in a separate text box.
- There are 5 different text sizes in the rich text editor (1-5) whereas the style properties menu allows you to use text sizes you are used to (e.g. 10 or 12 point etc.).
If you are using the properties menu, follow these steps:
- Click on the text box containing the text you want to edit.
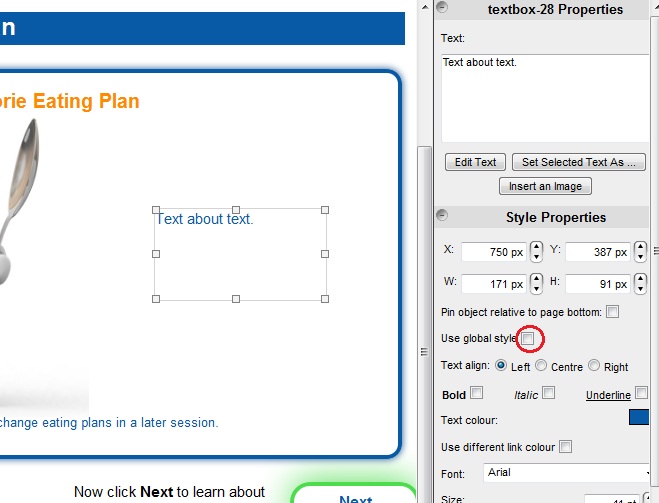
- Make sure the tick box next to Use global style is not ticked, (circled in the image below) as you will see more editing options.
- Within this tool bar you can edit the text box as a whole, e.g. change the font size, colour and type.
Tips for using the Rich text editor
As the Rich text editor does not have an option for inserting special symbols (e.g. the degree symbol - °) you will need to copy and paste these symbols from Microsoft Word into the text editor. When formatting individual words in the rich text editor, make sure you only highlight the words that you want to change. If you highlight the space before or after the selected word this will result in the space disappearing in your text. This is an unavoidable feature of the LifeGuide rich text editor.
Lines, Curves and Shadows
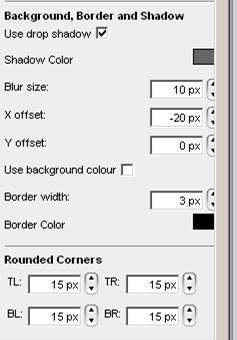
You can make the edges of your text boxes rounded or shaded using the options in the Style Properties menu. To make your boxes rounded, change the figures in the TL (top left), TR (top right), BL (bottom left) and BR (bottom right) boxes.
NB: To be able to see your rounded corners, you will need to make sure that the border of your text box is wide enough to show up (by default the border of a text box is not set to show). This can be changed using the border width option in the style properties menu.
Shadows can be added by selecting the Use drop shadow option.
Blur size refers to how blurred you want the shadow to be. A smaller number will result in a deeper block colour, whilst a larger number will result in a more blurred colour.
X offset refers to how far to the left of the text box that you want the shadow to be. A minus number will move the shadow to the left side of the text box.
Y offset refers to how far from the top of the text box that you want the shadow to be. A minus number will move the shadow to the bottom of the text box.
You can also put lines, curves or other shapes into your LifeGuide intervention by using the tools in Microsoft PowerPoint and saving the shapes as an image. These images are then inserted into your intervention page in the same way as other image files in LifeGuide.


