Introduction: Difference between revisions
No edit summary |
No edit summary |
||
| (One intermediate revision by the same user not shown) | |||
| Line 5: | Line 5: | ||
This page will show you around the tool and introduce some of its key aspects and terms that will be used in the rest of the help-files. | This page will show you around the tool and introduce some of its key aspects and terms that will be used in the rest of the help-files. | ||
[[Image:Authoringtool.jpg|frame| | [[Image:Authoringtool.jpg|frame|thumb|left|The LifeGuide Authoring Tool]] | ||
= A: The main Option Bar = | = A: The main Option Bar = | ||
| Line 32: | Line 32: | ||
This is the area where you can see the page that you are creating. | This is the area where you can see the page that you are creating. | ||
Here, you can drag and drop objects within the page to change the positioning. | Here, you can drag and drop objects within the page to change the positioning. | ||
= E: The Insert Panel = | = E: The Insert Panel = | ||
Latest revision as of 15:32, 13 September 2010
Introduction to the Authoring Tool
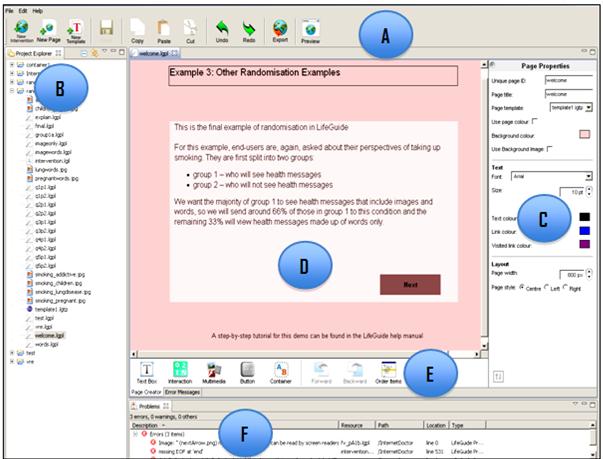
This is the authoring tool. This is where you can create your intervention pages and write the logic to make the intervention work.
This page will show you around the tool and introduce some of its key aspects and terms that will be used in the rest of the help-files.
A: The main Option Bar
This includes the basic functions of the authoring tool, including buttons to
- create new interventions
- create new pages
- create a new template for your pages
- save your intervention pages
- copy and paste intervention objects
The main option bar also includes the preview function (allowing you to preview your intervention as a webpage before you export it online) and the export button.
B: The Project Explorer
This area displays all of the intervention projects that have been created in or imported into your authoring tool. Each project folder under the Project Explorer will include all of the files for the intervention, including the page files, template files, image files, video files, and, importantly the logic file.
C: The Properties Menu
The properties menu is where you can change the properties of the intervention page and any objects on the page. When you are on the background of the page, the properties menu will be called Page Properties; when you click on an object, for example a textbox, it will detail the properties for that object, e.g. Textbox properties The properties menu allows you to name, edit and position the objects on the page. To edit the style of an object you will need to deselect the Use global style checkbox under Style Properties. This will open up a list of options which will allow you to change the style. Click on the double arrow symbol on the bottom of the properties menu to extend the menu and see all options.
D: The Page Author
This is the area where you can see the page that you are creating. Here, you can drag and drop objects within the page to change the positioning.
E: The Insert Panel
This is where you can select the objects that you wish to add to your intervention. You can add:
- Textboxes
- Interactions (single/multiple choice, text entry, calendar)
- Multimedia files (images, video, audio and flash)
- Buttons
- Containers
The insert panel is also where you can select the order of how objects are displayed on the page by using the forward and back buttons and the order items options.
F: The Problem Message Area
Hopefully you won’t have to use this area too often!!
This is the part of the authoring tool that details any problems that you have in the logic so that you can try and rectify them. If you have a long list of problem messages you can drag the line below the insert panel upwards to see the whole list.
